The following blog by Jacqui Moore was originally published on Do Mo(o)re With Data July 1, 2022 and is cross-posted here with permission. Jacqui Tableau Social Ambassador and a Senior Data Analytics and Viz Consultant for Cleartelligence.
This post describes the second of two methods for creating an Org Chart in Tableau. If you haven’t read the post where I give a short summary of the pros and cons of each method, you can find that here. If you would like to download the data, and follow along, you can download my files for follow along here.
In order to create an org chart (or any hierarchy chart or dendrogram) you will need to establish the relationship between each employee and every level of the hierarchy above them, as well as to their own direct reports.
To do this, using only Tableau Desktop, we will create a join for every relationship in the hierarchy. One for each level of management, all the way up to the CEO, and one for employees they directly manage.
We will start, as these things usually do, with data. You will need an employees table containing at least the employee’s name, and the name of their manager. Preferably, it will have IDs. It may also have other information about the employee. It will probably look something like this:

Let’s get started…
Data Prep
Below, I walk through how this can be done in Tableau Desktop. If you would like do the data prep in Tableau Prep, SQL, or Alteryx, I recommend using Method 1.
First, we will handle the supervisor hierarchy. This is done using a series of self-joins.
Connect to the employees table, and place it on the data canvas. For this, we don’t want to use Relationships Model, so double click the table to create the physical model.
We need two records for each employee. To do this, we will union the table with itself. Drag the table out again, and create the union.
Append “L1” to the [Manager] and [Manager ID] field by renaming the fields to [Manager L1] and [Manager ID L1]. It’s going to be important to clean up and rename fields as we go through this, so that it is clear when we go to build the dashboard.
Bring in the employees table again, and left join on [Manager ID L1] = [Employee ID]
Append L2 to the newly added [Manager] and [Manager ID] fields, and hide all other fields from the the second instance of the table. At this point, your data source will look like this:

Now, we will continue to do this until there are no additional levels of management. [Manager ID L2] = [Employee ID], [Manager ID L3] = [Employee ID], etc. You are done when the newly added [Manager] field is null for all employees.
If you are following along with the Rebel Alliance data set, your data source will look like this:

Next we will bring in subordinates. Join the table to itself again, this time on [Employee ID] = [Manager ID]
Rename [Employee ID] to [Subordinate ID], and [Employee] to [Subordinate], and hide all other fields from the newly added instance of the table.
Now your data source should look like this:

Building an Interactive Dashboard
First, we need to create the X and Y coordinates that will place marks on the view.
Create a calculated field called [X Axis] = (INDEX()+1)/(SIZE()+3). This field will dynamically space the marks on the canvas horizontally based on the number of marks in each level. I didn’t come up with this calculation, for that full credit goes to Jeff’s post.
Create a calculated field called [Y Axis]. This should start with the highest Manager Level in your data source. In the Rebel Alliance data set we just created, there are 5 levels. This field will position the mark vertically on the canvas.
IIF(ISNULL([Manager ID L5]),1,0) +
IIF(ISNULL([Manager ID L4]),1,0) +
IIF(ISNULL([Manager ID L3]),1,0) +
IIF(ISNULL([Manager ID L2]),1,0) +
IIF(ISNULL([Manager ID L1]),1,0)
Drop [X Axis] on Columns, and [Y Axis] on Rows
Create a calculated field called [Path]. Place [Path] on Detail. What we are doing here is creating a common field between a manager and their subordinate to draw the lines between marks.
IF [Table Name]="RebelAlliance" THEN [Employee]+[Subordinate]
ELSE [Manager]+[Employee]
END
Create a combined field from [Y Axis] and [Employee]. To do this, first drag [Y Axis] from measures to dimensions. Then click Employee, and Ctrl + Click Y Axis. Right click, and select Create > Combined Field. This will create a field called [Y Axis & Employee (Combined)]. This combined field allows us to do some things we wouldn’t be able to do with a calculated field, which we need later.
Create a field called [Sort], which will be used to put employees in order under their supervisor. This should contain all manager levels, in descending order. In this example, there are 5 manager levels.
IFNULL([Manager L5],"") +
IFNULL([Manager L4],"") +
IFNULL([Manager L3],"") +
IFNULL([Manager L2],"") +
IFNULL([Manager L1],"") +
[Employee]
Drop Employee on Label, and set the mark type to Shape.
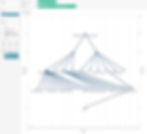
Don’t worry, it’s not supposed to look like anything yet!
Right click on X Axis, and go to “Edit Table Calculation”.
Set “Compute Using” to “Specific Dimensions”
Employee and Path should be checked. Y Axis should be unchecked. Any additional fields you would like to add to the labels on the view should also be checked. You can also typically add ATTR(Fields) without changing the table calculation.
“At the level” should be [Employee].
Finally, set “Sort Order” to Custom Sort, pick the [Sort] field, and set the aggregation to Minimum.
You will have something that looks like this now:

Create a dual axis with MIN(Y Axis) and synchronize the axis. Remove employee from the marks card for this second axis. Change the mark type to Line.
Now wait… what’s going on with these lines?

Drag [Path] to filters, and exclude Null.
There you have it, an org chart.
Now, it’s hard to use the full org chart like this, so let’s make it interactive.
Create a parameter called [Selected Employee], and set it to string. Use dynamic parameters to populate the list of allowable values.

Create a calculated field called [Selected Employee Filter] and place it on the filters shelf, set to include TRUE. This will include any employees on the view that are directly related to the employee that’s been selected. You can add additional levels here, if you’d like to see more than one level of subordinates in the view at a time
[Selected Employee]=[Employee]
OR
[Selected Employee]=[Subordinate]
OR
[Selected Employee]=[Manager L1]
Edit each axis and deselect “Include 0” to center the org chart on the view, then hide the axes.
Create a new dashboard, and place the sheet on the dashboard. You will then have something that looks like this:

Next, we will add the interactivity. Go to Dashboard > Actions. Then under “Add Action” select Change Parameter.
“Target Parameter” is [Selected Employee]. Source field is [Employee].

There you have it. An interactive Org Chart in Tableau.

Don’t forget the formatting!
Use Brian’s highlight trick to get rid of the default highlighting
Make the lines lighter and thinner to give visual priority to the names
Add an indicator to the circles to let users know if there is something to drill into
Format the labels
Change the tooltips
Put some branding on the dashboard
Add the parameter to the view to allow users to select an employee
Set it to the CEO (or top of your hierarchy) before publishing
You can see my final product on Tableau Public.
Building an alternative view of the whole organization
The layout we just built works really nicely for an interactive dashboard where you are looking at one person at a time. However, if you want to look at multiple levels of the organization at once, or have employees with a large number of direct reports, you will need a different layout. With all we have already done, creating this view is very straightforward.
Duplicate the org chart sheet
Swap Rows and Columns using the icon in the toolbar, or Ctrl+W
Replace [X Axis] with ATTR([Sort])
Right click on the Y Axis, and check “Reverse”
Change the height of the rows to get the spacing how you like it

Hide the [Sort] field, and right click to uncheck show headers on the [Y Axis]

You can add any or all of the formatting and interactivity we went through earlier, or use this as a static or printable version that you link to from your interactive dashboard.
You can see my final version here. If you want to learn about the other method, you can find that here.