This step-by-step tutorial walks through how to create a Bump Chart with Bars and Curved Lines. It was originally published by Brian Moore in the "Totally Useless Charts" series of his blog Do Mo(o)re With Data on January 25, 2022. It's cross-posted here with his permission. Brian is a Tableau Visionary and Tableau Evangelist for Cleartelligence.
Ok, so this chart may not be totally useless, but I’m going to keep it in this category because it’s something I would never build at work. I love a good bump chart, but there is one major limitation with traditional bump charts. They are great for displaying changes in rankings over time, but what about the data driving those rankings. How much has a value changed from one period to the next? How much separation is there between #1 and #2? Surely a bar chart would be better for that type of insight right? Well, in this tutorial, we’re going to walk through building a chart that combines all of the benefits of bump charts and bar charts, and with some fancy curves to boot.
I’m sure I’m not the first to build this type of chart, but the first time I used it was in my 2020 Iron Viz Submission to show Happiness Scores by continent over time.

Looking back, there are definitely some things I would change about this, and I’m going to address those in the chart we are about to build. The data we’re going to be using for today’s walkthrough is on Browser Usage Share over the last 13 Years (showing usage at every 3-year increment). You can find the sample data here, and the sample workbook here. This is what we’re going to build.

Building Your Data Source
Our data source (on the Data tab in the sample file) contains 5 fields. We have a Time Period (our Year field), a Dimension (the Browser), and a Value (the Share of Usage). There are also 2 calculated fields in this file. These could be calculated in Tableau using table calcs, but because of the complexity of some of the other calculations, we’re going to make it as easy as possible and calculate these in the data source. The [Period] field, is just a sequential number, starting at 1, and it is related to the Date field. The [Rank] field is the ranking of each Browser within that period.
On the next tab (Densification), we have our densification data. There is a [Type] field, which will allow us to apply different calculations, in the same view, for our bars and our lines. There is a [Points] field, which will be used to calculate the coordinates for all points for both the bars and the lines. And there is a [T] field, which will be used to draw the sigmoid curves connecting each of the bars.
If you are building this with a different set of data, just replace the Date, Browser, and Share fields in the Data Tab. The calculated fields should update automatically.
Now for joining this data. We are going to do two joins in the Physical layer in Tableau. We are going to do a self-join on the Data to bring in the rank for the next period, and we’re going to join to our densification data using a join calc.
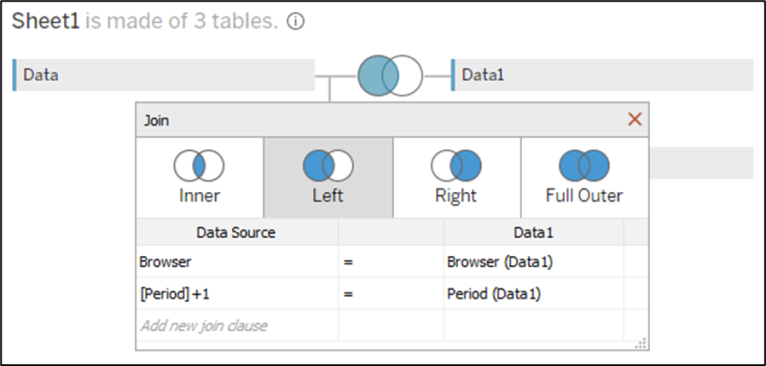
To get started, connect to the Sample Data in Tableau and bring out the Data table. Then double-click to go into the physical layer. Now drag out the Data table again. First, join on [Browser]. Then create a join calculation on the left side of the join, [Period]+1 and join that to [Period]. Then set it as a Left Join. It should look something like this.
Now bring out your Densification table, and join that to the Data Table using a join calculation, with a value of 1 on both sides of the join. Like this.

Now go to a new worksheet and rename the following fields.
Period(Data1) change to Next Period
Rank(Data1) change to Next Rank
I would also recommend hiding all other fields from the Data1 table to avoid confusion later on.
Building the Bars
To build the bars in this chart, we are going to use polygons. So we’ll need to calculate the coordinates for all 4 corners for each of our bars. Let’s start with Y, since that one is a little easier.
The first thing we are going to do is create a parameter to set the thickness of our bars. Create a parameter called [Bar Width], set the Data Type to Float, and set the Current Value to .75.
We are going to use the [Rank] field as the base for these calculations. Then, we are going to add half of the [Bar Width] value to get the upper Y values, and subtract half of the [Bar Width] value to get the lower Y values. Let’s create a calculated field for each of those, called [Y_Top] and [Y_Bottom].
Y_Top = [Rank]+([Bar Width]/2)
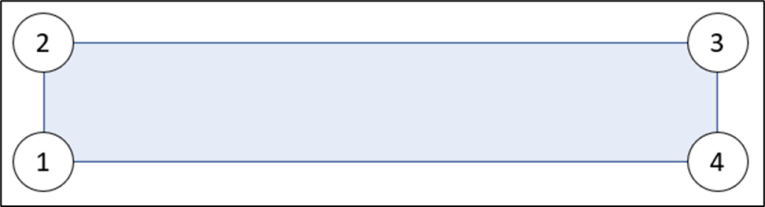
Y_Bottom = [Rank]-([Bar Width]/2)If you look back at our Densification table, we have 4 points for the Bars, one for each corner. The order of these doesn’t really matter (but it is important that you are consistent when calculating the X and Y coordinates). In this example, we are going to start with point 1 at the bottom left, point 2 at the top left, point 3 at the top right, and point 4 at the bottom right.
Like this:
Now we’ll create a calculated field that will calculate the Y value for all 4 points. Call this [Bar_Y]
CASE [Points]
WHEN 1 THEN [Y_Bottom]
WHEN 2 THEN [Y_Top]
WHEN 3 THEN [Y_Top]
WHEN 4 THEN [Y_Bottom]
END
Now we need to do something similar for our X values, but instead of calculating the top and bottom positions, we need to calculate the left and right positions. Here, we will use the [Period] field as the base (which will also be the left side value), and then add the length of the bar to get the right side values.
If you remember from earlier, our [Period] field is a sequential number, starting at 1, and in this example, ending at 6. So each period has a width of 1. But we don’t want our bars going all the way up to the next period, so we’ll use a parameter to add a little spacing. Create a parameter called [Period Spacing], set the Data Type to Float, and set the Current Value to .3.
With this parameter and it’s current value, our largest bar in the chart should have a length of .7 (or 1 minus .3). All of our others bars should be sized relative to that. But first, we need to find our max value, which we will do with a Level of Detailed Calculation called [Max Value].
Max Value = {MAX([Share])}And now we’ll calculate the length of all of our bars by dividing their [Share] by that [Max Value], and then multiplying that by our maximum bar length of .7 (or 1 minus .3). Call this calculation [Bar Length]
Bar Length = ([Share]/[Max Value])*(1-[Period Spacing])Now, similar to what we did for our Y values, we are going to create calculated fields for [X_Left] and [X_Right]. [X_Left] will just be the [Period] value, and [X_Right] is just the [Period Value] plus the length of the bar, or [Bar Length]
X_Left = [Period]
X_Right = [Period]+[Bar Length]
Let’s take another quick look at the order of points:

So Point 1 should be the left value, Point 2 should also be the left value, Point 3 should be the right value, and Point 4 should also be the right value. So let’s use this to calculate [Bar_X].
CASE [Points]
WHEN 1 THEN [X_Left]
WHEN 2 THEN [X_Left]
WHEN 3 THEN [X_Right]
WHEN 4 THEN [X_Right]
END
Now let’s test out our calculations so far:
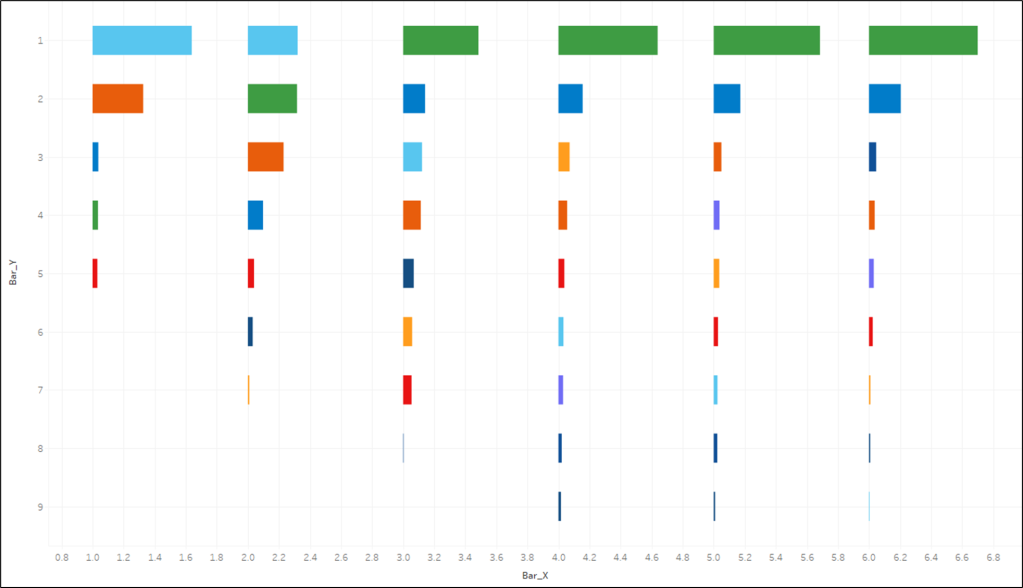
Drag [Type] to the filter shelf and filter on “Bar”
Right click on [Bar_X], drag it to Columns, and when prompted, choose [Bar_X] without aggregation
Right click on [Bar_Y], drag it to Rows, and when prompted, choose [Bar_Y] without aggregation
Right click on the Y axis, select Edit Axis, and then click on the “Reversed” checkbox
Change the Mark Type to “Polygon”
Right click on [Points], drag it to Path, and when prompted, choose [Points] without aggregation
Drag [Browser] onto Color
Right click on [Period], drag it to Detail, and when prompted, choose [Period] without aggregation
When finished, your view should look something like this:
Now onto our lines!
Building the Lines
Before starting this section, I would recommend taking a look at Part 3 of the Fun With Curves Blog Series on Sigmoid Curves.
The first calculation we need is [Sigmoid]. As I mention in the post above, this is a mathematical function that will appropriately space our Y values.
Sigmoid = 1/(1+EXP(1)^-[T])Now, let’s calculate the Y coordinates, which in this case, we’ll call [Curve]. To calculate this, we’re going to use the [Rank] field as our base. Then we’re going to calculate the total vertical distance between the rankings for one period and the next and multiply that by our Sigmoid function to get the appropriate spacing. In the calculation below, the first part is optional, and is included only for labelling purposes. For the final period, there is no [Next Period], so this value would end up being blank, resulting in no label in our final step. So feel free to skip it and just use the portion between ELSE and END if you’re not going to label the bars.
Curve = IF [Period]={MAX([Period])} THEN [Rank] ELSE [Rank] + (([Next Rank] – [Rank]) * [Sigmoid]) ENDThe [Curve] calculation will give us our Y coordinates for all of points, so we just need X. Before we do that, let’s create one more Parameter that will be used to add a little spacing between the end of the bar and the start of our line (so the line doesn’t run through the label, making it difficult to read). Call this Parameter [Label Spacing], set the Data Type to Float, and set the Current Value to .15.
Now, we’re going to create a calculation for the start of our lines, which will be the end of the bar + spacing. I’ve also added a little additional logic so that the amount of spacing will depend on whether the label is 1 or 2 characters. If the [Share] value is less than 10 (1 character), we’ll multiply the [Label Spacing] by .7, and if it’s over 10, we’ll use the [Label Spacing] as is. Call this calculation [Line_Start]
Line Start = [X_Right]+IF [Share]<10 THEN [Label Spacing]*.75 ELSE [Label Spacing] END
Our next calculation will calculate the horizontal spacing for our points. In our Densification table, we have 25 Points for the lines, and this calculation will be used to evenly space those points between the end of one bar (plus the spacing for the label), and the start of the next bar. Call this calculation [Point Spacing].
Point Spacing = if [Period]={MAX([Period])} THEN 0
ELSE ([Next Period]-[Line_Start])/({COUNTD([Points])-1})
END
Similar to the [Curve] calculation, the first part of this IF statement is only for labelling purposes. If you’re not going to label your bars, you can just use the portion of the calculation between ELSE and END.
And now, with our [Line_Start] and our [Point_Spacing] fields, we can calculate the X coordinates for all 25 of points of each line. Call this [Line_X].
Line_X = [Line_Start]+(([Points]-1)*[Point Spacing])Now let’s test out our calculation:
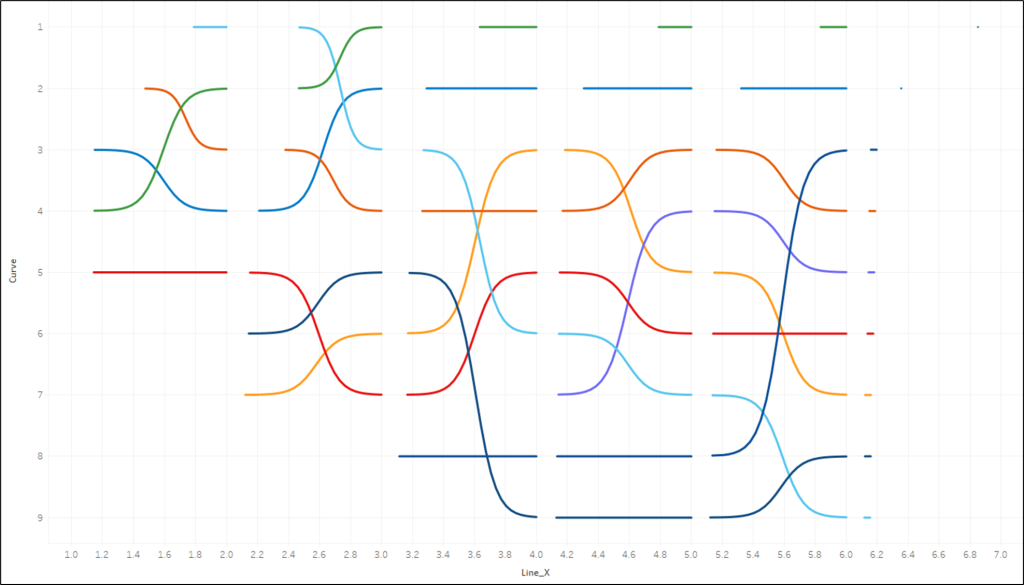
Drag [Type] to the filter shelf and filter on “Line”
Right click on [Line_X], drag it to Columns, and when prompted, choose [Line_X] without aggregation
Right click on [Curve], drag it to Rows, and when prompted, choose [Curve] without aggregation
Right click on the Y axis, select Edit Axis, and then click on the “Reversed” checkbox
Change the Mark Type to “Line”
Right click on [Points], drag it to Path, and when prompted, choose [Points] without aggregation
Drag [Browser] onto Color
Right click on [Period], drag it to Detail, and when prompted, choose [Period] without aggregation
When finished, it should look something like this:
Now all that is left to do is to combine our “Bar” calculations and our “Line” calculations in the same view.
Building the Final Chart
Because of the way we set up our Densification table, we have separate points for each of our bars and each of our lines. With just a few more simple calculations, we can bring everything together in the same view.
We want to leverage two different Mark Types in this view, Bar and Line, so we’ll need to create a Dual Axis chart. In order to do this, we’ll need a shared Field on either the Column or Row shelf, and then we’ll need separate fields for our Lines and Bars on the other Shelf. In this example, we’ll create a shared field for Rows, called [Final_Y].
Final_Y = IF [Type]=”Bar” THEN [Bar_Y] ELSE [Curve] ENDThis calculation is pretty straight forward. For our “Bar” records (where the [Type] field in our densification table = Bar), use the Y coordinates for our Bars, [Bar_Y]. Otherwise, use the Y coordinates for our Lines, [Curve]. We’re going to do something similar for X, but we need separate calculated fields for the Bars and Lines to create our Dual Axis. We’ll call these [Final_X_Bar] and [Final_X_Line].
Final_X_Bar = IF [Type]=”Bar” THEN [Bar_X] END
Final_X_Line = IF [Type]=”Line” THEN [Line_X] END
And now we’ll use those 3 calculated fields to build our final view.
Let’s start with the Bars:
Right click on [Final_X_Bar], drag it to Columns, and when prompted, choose [Final_X_Bar] without aggregation
Right click on [Final_Y], drag it to Rows, and when prompted, choose [Final_Y] without aggregation
Right click on the Y axis, select Edit Axis, and then click on the “Reversed” checkbox
Change the Mark Type to “Polygon”
Right click on [Points], drag it to Path, and when prompted, choose [Points] without aggregation
Drag [Browser] onto Color
Right click on [Period], drag it to Detail, and when prompted, choose [Period] without aggregation
Drag [Type] to Detail
And now we’ll add our lines:
Right click on [Final_X_Line], drag it on to Columns to the right of [Final_X_Bar], and when prompted, choose [Final_X_Line] without aggregation
Right click on [Final_X_Line] on the Column Shelf and select “Dual Axis”
Right click on either X axis and choose “Synchronize Axis”
On the Marks Card, select the [Final_X_Line] Card
Change the Mark Type to “Line”
Remove “Measure Names” from Color
On the Marks Card, select the [Final_X_Bar] Card and remove “Measure Names” from Color
Right click on the Null indicator in the bottom right corner and select “Hide Indicator”
When finished, the chart should look something like this:
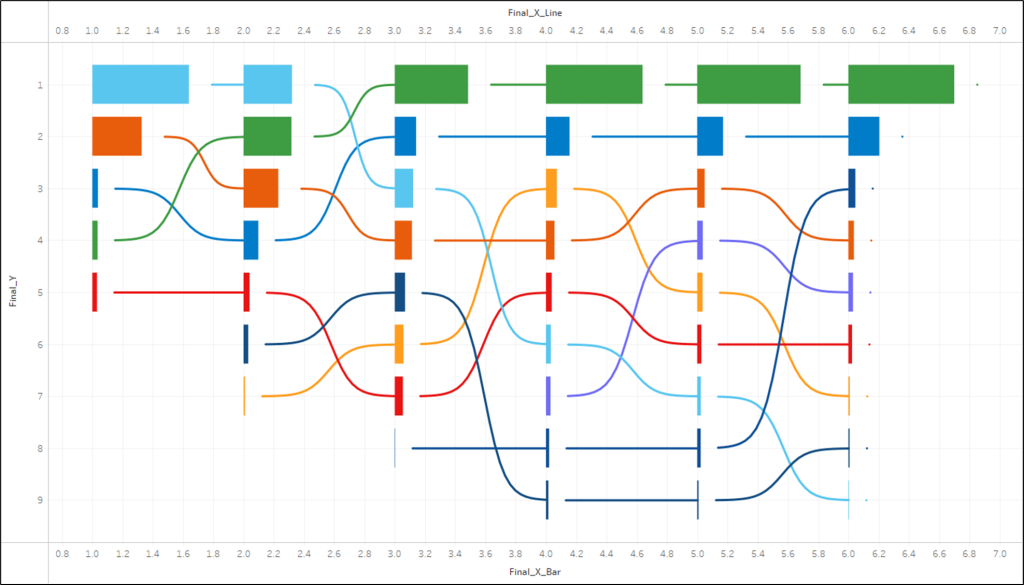
Now for the final touches
Formatting the Chart
All of these steps are optional and you can format the chart however you’d like. But these are some of the adjustments that I made in my version.
First, I added labels. You can’t label Polygons, so our label has to go on the [Final_X_Line] Card. So click on that Card and then drag the [Share] field out onto Label. Then click on Label and under “Marks to Label”, choose “Line Ends”, and under “Options”, choose “Label start of line”. Then, because the values in my [Share] field are whole numbers instead of percentages (ex. 20% is listed as 20 instead of .2), I added a “%” to the end of the label (by clicking on the Text option) and formatted the field as a Whole Number.
The Label options should look like this:

Those Label options, along with the [Label Spacing] parameter we created earlier, should give you a pretty nice looking label between the end of your Bar and the start of the Line.
Next, I cleaned up and formatted the Axis. For the X axis, I set the Range from .9 to 7 and then hid both of the X axes. For the Y axis, I set the range from .5 to 9.5, and set the Major Tick Interval to 1. I then removed the Axis title and made the text a bit larger. I also used a Custom Number Format, so I could put a “#” sign before the Ranking number. Like this.

Then I added some Grid Lines on Columns to give the Bars a uniform starting point, and some really faint Grid Lines on Rows to make it easier to track the position for any given Bar.
Finally, on the dashboard, I added a Title, I added a second simple worksheet to display the Years, and added a Color Legend that can also be used to Highlight any of the Browsers.
And here’s the final version:
As always, thank you so much for reading, and if you happen to use this tutorial or the template, please reach out and share what you built with us. We would love to see it! Until next time.